Goldwork embroidery is doing by using metallic French purl wires on fabric. In this blog we will learn how to do hand embroidery with French purl wires to create different finishes of goldwork.
We will be making a Rose flower design in five different hand embroidery techniques as shown below.

Basic Supplies & Points for Goldwork Embroidery
1: - In Hand embroidery work, you will be cutting the French purl wires in size of 0.5MM. We will suggest you that you keep a separate scissor or cutter for it.

2: - Always take 11 number of pony needle because it can pass through the 1MM diameter of French wire easily.

3: - Take Art Silk or any Rayon thread of 0.1MM size (which is the general size of thread) and cut it in 20inch length. Then pass one edge of the thread through the needle eye and tie both the ends together as shown in picture 3. Quick suggestion, Always take the thread of same color as the fabric is. These are basic goldwork supplies.

1: - Beaten work Goldwork: -
It’s also called pita or pitta work in India & Pakistan. Basically, you hammer the backstitch French wire embroidery with a wooden hammer, which is shown in picture 10th.
So, first let’s make the outline of rose with backstitch technique.
Backside: - Now as shown in picture 1, from any starting point punch the needle at the backside of fabric and bring it towards the front side.
Front side: - On front side, pass the needle through one of the French wire piece as shown in picture 2 & punch the needle 5MM in forward direction on the rose print. Make sure that the difference between your two punches is quite equal to the length of French wire piece.
Backside: - Now punch the needle 5MM forward and bring the needle on the front side.
Front side: - take the French wire in needle and punch the needle backward near the 2nd punch as shown in picture 7th and you will have a embroidery like picture 8th,
Repeat Process: - Now on backside you need to punch 10MM forward and on front side take the French wire and punch 5MM back ward (near the last punch) to finish this backstitch french wire embroidery.
Once the embroidery is finished then take the wooden hammer and base and beat the french wires embroidery to get the beaten goldwork effect as shown in picture 11th and 12th.

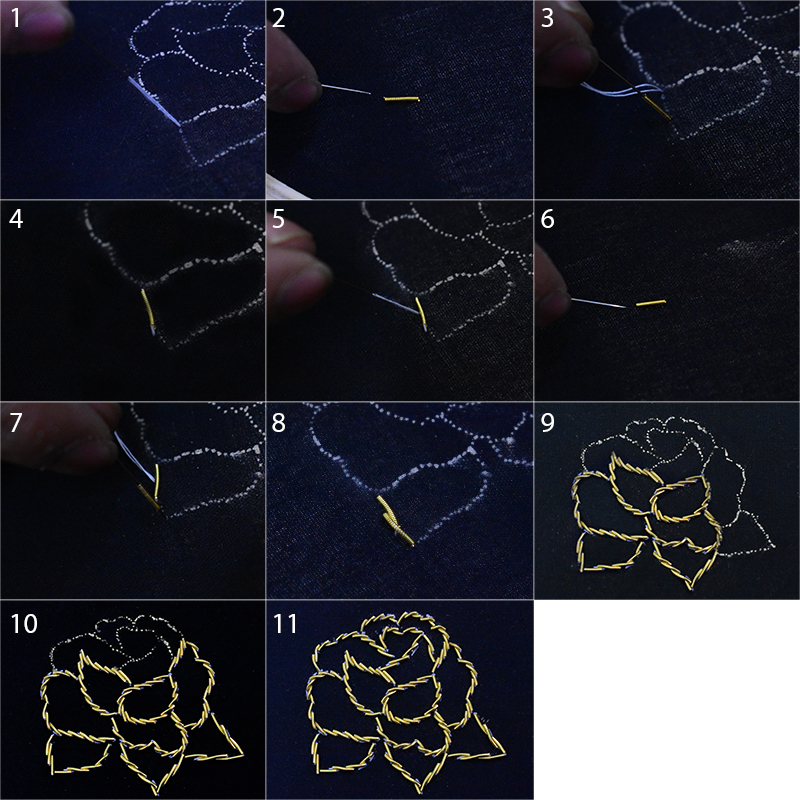
2: - Goldwork by Outline or Twisted Stitch: -
As the name suggest the embroidery is little twisted in this technique.
Backside: - As explained in earlier embroidery also, punch the needle at any starting point and bring it towards the front side.
Front side: - Pass the needle through any French wire piece as shown in picture 3rd and punch the needle forward at the same length as the metallic wire piece is.
Backside: - Punch the needle near the center of 1st French wire embroidery piece and it will come out on front side as shown in picture 5th & bring the needle on the front side.
Front side: - Pass the needle through the French wire piece & punch the needle forward at the same length as the French wire piece is as shown in picture 7th. It may that the French wire pass on top of the already embroidered wire piece. Which is perfectly fine.
Repeat process: - Follow this technique of punching backwards at the backside near the center of last embroidery French wire piece and forward on the front side with the French wire piece to finish the outline or twisted goldwork embroidery of rose flower print as shown in picture 10th and 11th.
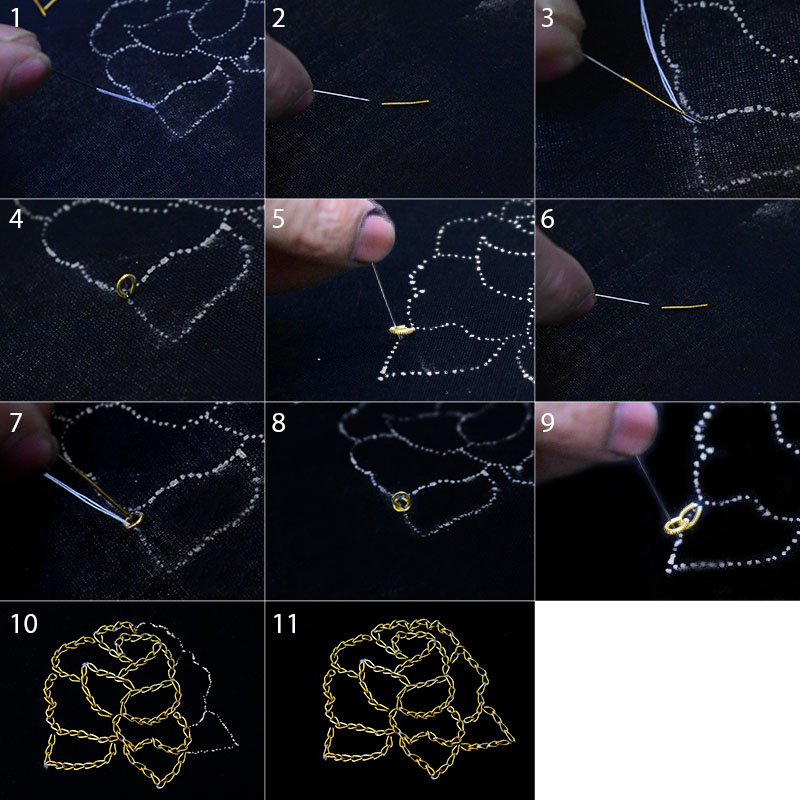
3: - Goldwork Embroidery by Chain Stitch: -
Backside: - Punch the needle at any starting point & bring the needle towards the front side.
Front Side: - Pass the needle through any French wire piece & punch the needle near the first punch as shown in picture 3rd and start pulling the needle towards the backside. Do not pull the whole thread; leave when you see a loop of French wire is remaining at the front side like picture 4th
Backside: - Punch the needle 5MM forward and pass the needle through the loop on the front side as shown in picture 6th.
Front Side: - When you will pull the thread then the loop will get flatten. After that, pass the needle through another French wire piece and punch the needle inside the loop as shown in picture 7th and start pulling the thread towards the backside. Again leave when only the French wire loop is remaining.
Repeat Process: - Follow this technique of punching forward from the backside till the length of French wire loop and then pass the needle through the loop on front side and then through the French wire piece and punch it back inside the flatten loop.
This process will help you to finish your goldwork embroidery by chain stitch as shown in picture 11th and 12th.
4: - Basketweave Goldwork Embroidery: -
First of all, make the outline of rose flower design with backstitch embroidery technique as shown in picture 1. We have used silver color french wire for this.
Now, cut the French wires in different lengths to fill inside the rose petals as shown in picture 2nd.
Backside: - Punch the needle 3mm down from the top of any rose petal near the outline as shown in picture 4th and bring the needle towards the front side.
Front side: - Now, you have to make a straight line with French wire. So, just be sure that the French wire piece that you take is of equal length to the distance of other sideline of rose petal.
Pass the needle through the French wire and punch the needle near the other side of rose petal and You will have embroidery like picture 5th.
Repeat Process: - Please repeat this process of punching 3MM down at the backside to start the embroidery and then taking exact length of French wire at front side to make straight line embroideries as shown in picture 10th, 11th and 12th.

First part of basketweave goldwork embroidery is done. Now take French wires, which are cut in equal sizes
Backside: - Punch the needle at the top of rose petal as shown in picture 2 and bring the needle towards the front side.
Front side: - Take a French wire, pass it through the needle and punch over the horizontal embroidered single line of French wire as shown in picture 4th and bring the needle towards the backside. You will have embroidery like picture 5.
Repeat Process: - The trick to make a good basketweave is too keep equal distances between stitches and that can be achieve with a little trick. Now, the trick with goldwork is that you should always make the next stitch on the left and right of the French wire stitch where it ends as shown in picture 8th and 9th. Follow this technique to finish the goldwork embroidery in single leave first and then as shown in picture 10TH, 11th and 12th.

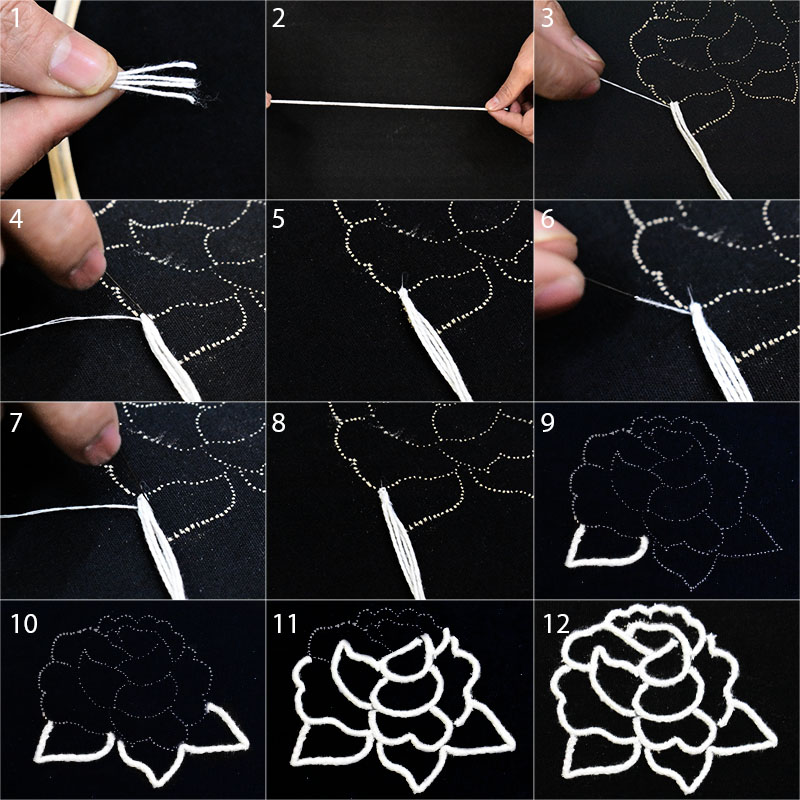
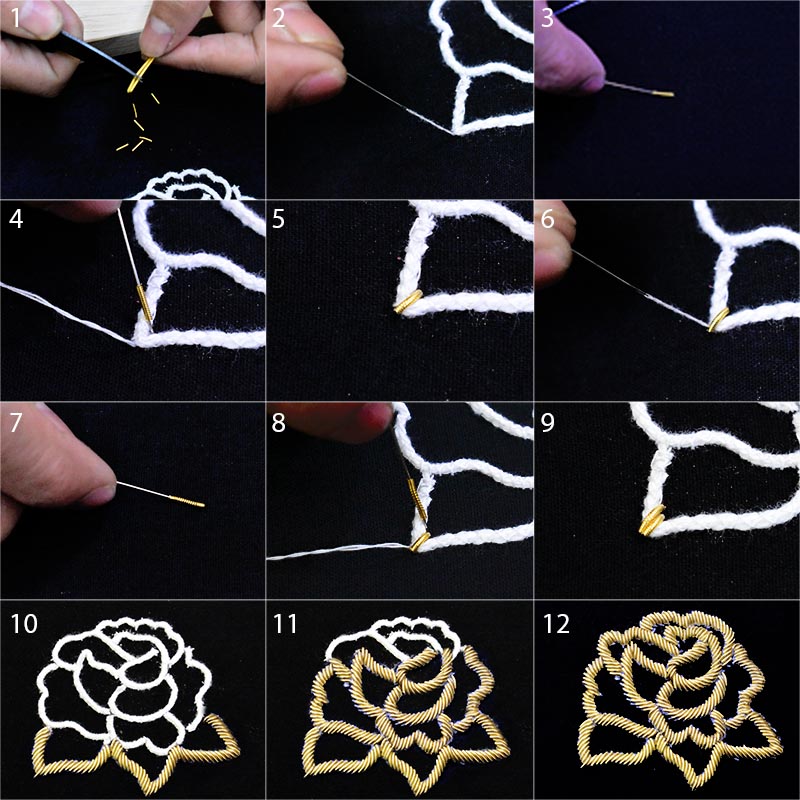
5: -Raised Goldwork (Padding) Embroidery: -
Take 4 to 5 strings of 0.5MM diameter of Cotton thread as shown in picture 1. Twist them together as shown in picture 2 and make a bunch of it.
Backside: - Now, punch the needle at the starting point of any rose petal as shown in picture 3 and bring the needle towards the front side.
Front side: - Place the twisted thread bunch on the tracing of rose design and pass the needle with thread over it.
Repeat Process: - You have to tie the bunch of cotton threads to the fabric by wrapping it with the needle thread. It will make a small-elevated thread hill on the traced rose design outline as shown in picture 10th, 11th and 12th.
Now, cut the French wires, make sure that their length can cover the elevated thread hill as shown in picture 5th.
Backside: - Punch the needle at the starting point of any rose petal as shown in picture 2nd and bring the needle towards the front side.
Front side: - Pass the needle through the French wire piece and punch the needle on the other side of thread hill as shown in picture 4 and you will have an embroidery like picture 5th.
Follow this process to make Raised Goldwork (Padding) embroidery in Rose flower design as shown in picture 10th, 11th and 12th.
We hope that you have liked our explanation of goldwork techniques. If you wish to practice these embroidery stitches and would like to have a goldwork embroidery kit then please mail us at care@embroiderymaterial.com. We will make one for you specially. Have a wonderful day.


